If you have any questions or are possibly looking for the easy way out and having someone else do this for you, send me an email I'll see if I can help.. other than that, GOOD LUCK!
List of items I collected prior:
Knowledge through research
One good buddy with a nice shop to work in
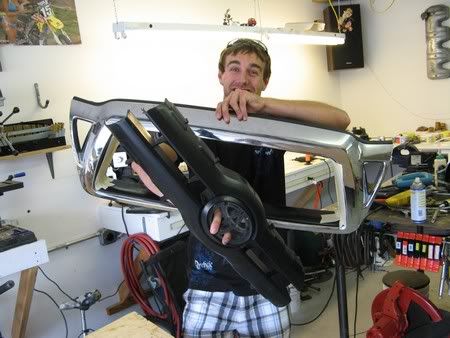
$28 - Used Chrome Toyota Grill Surround - screamin deal off of craigslist (normally $100+)
$20 - Bondo Fiberglass Repair Kit - i got the larger kit and used about 10% of it so get the smaller one and save some $$$
$10 - Bondo Body Filler - again I got the larger one, used about 50%
$2 - (2) cheap brushes - for applying fiberglass resin
$6 - Duplicolor Grease and Wax Remover
$5 - Duplicolor Black Sandable Primer
$5 - Rustoleum Industry Choice - Gloss Black (for mesh)
$5 - Masking Tape
$2 - Masking Paper
$12 - 80/220/400 Grit Sandpaper
$20 - Flat Expanded Metal Mesh (purchased from local weld shop)
$27 - Body matched paint in spray can (purchased from local auto paint shop - pint of paint was $20, putting 1/3 of that into a spray can was $7)
$16 - Loctite Epoxy
TOTAL: $158 (plus hours upon hours of FREE labor)
Possible Step before the Steps:
If you didn’t purchase a grill and want to just bravely do this to the one that came with your truck, you’ll obviously need to remove your grill first. Open the hood, remove the two screws at the top. Now, remove the two ‘expansion anchors’ on the top at each end. I removed these by using a putty knife to wedge up the inner portion and they came right out… Almost there! Just two more connectors left. Look down towards the bottom on each side and you’ll see another attachment (I’ll call this the weird looking contraption). This one can be easily released by squeezing and pushing down with a pair of pliers (see photo below of what you are trying to squeeze). Once you have these six connection points removed, pull the grill straight up and it should come out pretty easy.

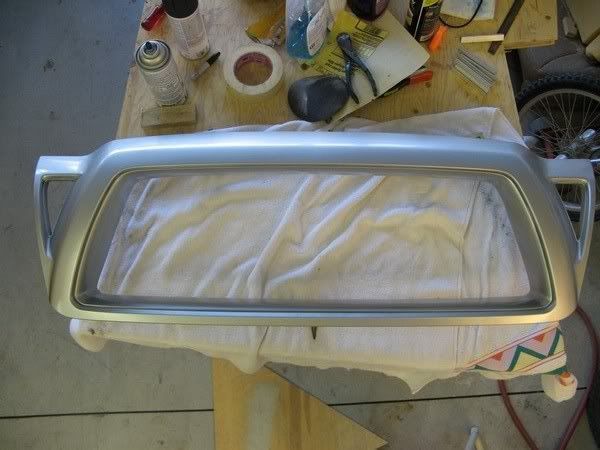
Step 1: Cutting out the center
First things first, we need to get that center outta there. I did this by using a jigsaw, but you can also use a dremel or some other tool if you wanted to… basically just do what you have to do to get that factory center crap out of there AND I think you should cut out the two side ‘fang’ areas… I cut those out by drilling a hole in each corner large enough to fit the jig saw in and cutting it as close and as careful as I could. After you have that all out, now comes our first experience with sanding (hope you like it cause there’s going to be more). Sand down all the places you cut so the surface is nice and flat. I used an air tool similar to a dremel and it worked great, sanding it all down quite fast.
Step 2: The repair process
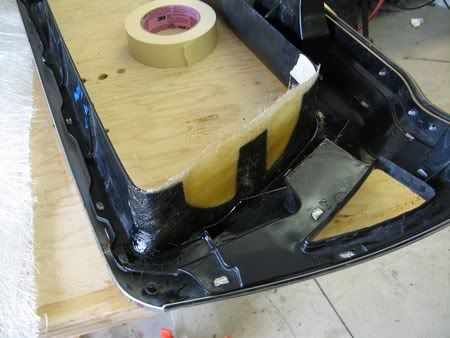
Now that we have the center cut out, we need to repair the two sides. I did this by using a fiberglass repair kit. Using this kit is quite simple, but make sure you use latex gloves… this stuff is REALLY sticky and sets fast… Prior to using the kit, I created a barrier on the inside using masking tape. This helped as guidance for placement as well as a way to keep the resin from seeping through and running all over the place. I cut (2) strips of fiberglass for each side (4 total), large enough to wrap the corners for additional support.
The thread I was following put it nicely so I will just quote this part:
“Follow the directions on the back of the Fiberglass Repair kit. Mix the resin and hardener in a mixing cup. You only have about 12-15 minutes before the mix hardens, so be patient and do this only one side at a time. I used about 2 ounces of resin and 25 drops of hardener for each side. Soak 1 fiberglass strip. Lay that strip of cloth over the gaps and the masking tape guide. Using the brush, smooth out the fiberglass resin and remove any trapped air bubbles. Lay another dry fiberglass strip over that one, dip the brush in the resin and brush enough to cover that piece. Repeat this procedure for the gaps on the other side of the grill. Wait 90 minutes for this to dry completely.” - quoted from http://www.toyotanation.com/forum/showthread.php?t=258681
You’ll notice that after you finish one side, your brush won’t work anymore… good thing you got two!
One mistake I made while doing this was missing the gap at the top of the grill… you can put some fiberglass there or just use my simple fix of using a little JB weld and attaching a piece of plastic cut from the center piece you removed in the prior step.
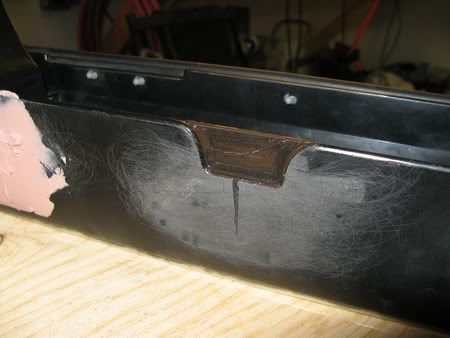
Step 3: Bondo Time
Scratch up the surface where you are to apply the bondo. I used 80 grit sandpaper and it worked just fine. Once its sanded similar to the photo above AND CLEANED, mix up your bondo by following the direction on the container. When mixing, make sure to get rid of the gray streaks or else it may take a while to set up... BUT, this stuff gets gummy fairly fast so get it mixed and applied. I used the plastic applicator included in the fiberglass kit (cut in half) and applied it pretty heavily over the fiberglass areas. After it cures (about 30 minutes), sand it down and see if there are any dips that still need filled. I used a block of wood and wrapped the 80 grit around it during the sanding process to avoid uneven sanding. If there are areas that seem low, mix up some more bondo and get reapplying… repeat as much as necessary to get a nice smooth surface. After all, the work you do now will pay off for months, years, decades to come. I had to mix up 4 batches of bondo before I was happy with my surface.
After you are happy with the surface, sand it down using 220 grit and follow that with 400 grit. Make it nice and smooth… REAL smooth.
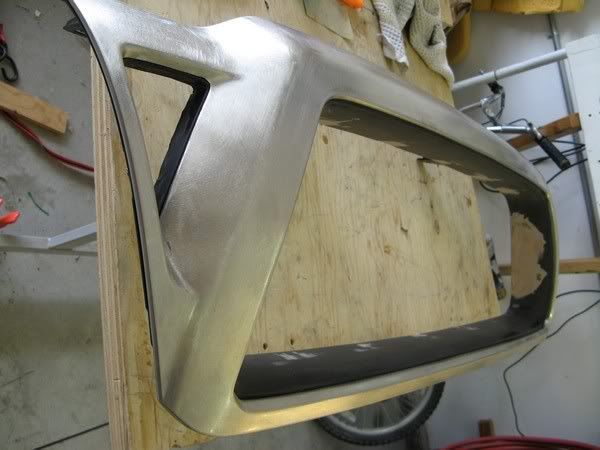
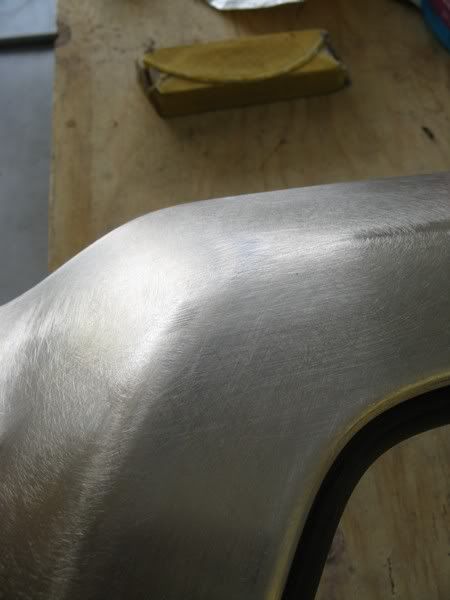
Step 4: If you have a chrome grill… have fun sanding.
I chose a chrome grill because I could found it for dirt cheap ($28 on craigslist). Only problem with this is that I needed to sand the bajesus outta it so that I could apply paint… There’s a great write up on painting chrome already on customtacos.com and here it is: http://www.customtacos.com/tech/index.php?article=208
Below are a few photos showing my chrome prep job… I used 80 grit with that wood block and hit it all hard once, then switched over to an air-powered orbital and quickly hit it again. I didn’t use the orbital for TOO long because I didn’t want to risk sanding away too much, losing some of the shape…
Step 5: Painting (Step 6 can be done during the dry times for Step 5)
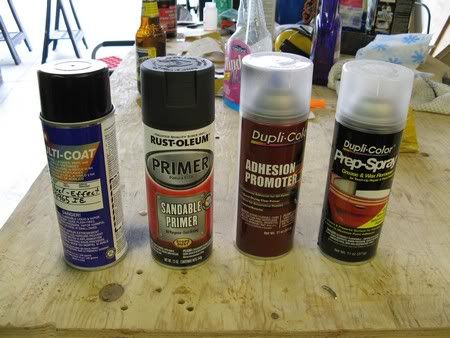
My game plan was to first clean the surface by blowing it off with an air gun and wiping it down with a rag, then clean off my finger oils with Prep-Spray. After you have it clean, follow the instructions on the back of each can. I applied 3 coats of Adhesion Promoter then 3 coats of sandable Primer. If you need to sand any rough areas out during the primer stage, I suggest waiting for it to dry and then using the 220 grit followed by the 400 grit and another coat of primer.
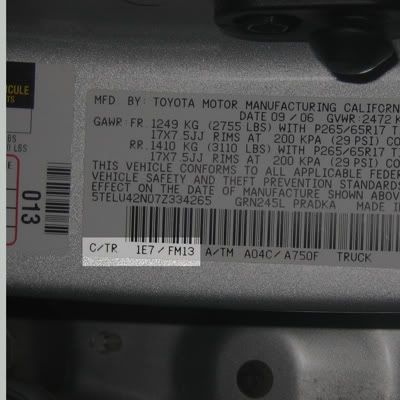
After you are happy with the primer coat, now comes the fun part. Lets make this thing match the truck! I had a local auto body shop mix up a pint of paint matching my body color. You can find the color code on the inside of your door as shown in the picture below. C/TR means Color/Trim... so my body color is 1E7.
The shop was then able to put 1/3 of the pint in a spray can and I kept the additional 2/3 pint for possible later usage. Now that we are ready to apply the body matched paint, apply your first coat lightly as sort of a tack coat. Then once that’s dry, follow it up with two more good coats and let it all dry for 24 - 48 hrs. The shop said that since I got one-stage paint I didn’t need any clearcoat, BUT, after I was all said and done, the shine just wasn't the same and it really needed clearcoat. Plus the clearcoat provides extra protection from the elements.
Optional Step After the Final Step:
Get some emblage! Typically people will put an old TOYOTA emblem from the old LandCruisers, but I went with a Chrome TRD emblem in the lower right just to break things up a little...

My game plan was to first clean the surface by blowing it off with an air gun and wiping it down with a rag, then clean off my finger oils with Prep-Spray. After you have it clean, follow the instructions on the back of each can. I applied 3 coats of Adhesion Promoter then 3 coats of sandable Primer. If you need to sand any rough areas out during the primer stage, I suggest waiting for it to dry and then using the 220 grit followed by the 400 grit and another coat of primer.
Game plan right to left
After you are happy with the primer coat, now comes the fun part. Lets make this thing match the truck! I had a local auto body shop mix up a pint of paint matching my body color. You can find the color code on the inside of your door as shown in the picture below. C/TR means Color/Trim... so my body color is 1E7.
The shop was then able to put 1/3 of the pint in a spray can and I kept the additional 2/3 pint for possible later usage. Now that we are ready to apply the body matched paint, apply your first coat lightly as sort of a tack coat. Then once that’s dry, follow it up with two more good coats and let it all dry for 24 - 48 hrs. The shop said that since I got one-stage paint I didn’t need any clearcoat, BUT, after I was all said and done, the shine just wasn't the same and it really needed clearcoat. Plus the clearcoat provides extra protection from the elements.
Step 6: Grill Work (as noted above: can be done while waiting for step 5 drying times)
I bought a 40”x12” sheet of flat expanded metal (plenty for what I needed) from a local welding shop for $20… You can either do that, find another mesh you like elsewhere or purchase a $200 grillcraft grill online… yeah, no thanks!
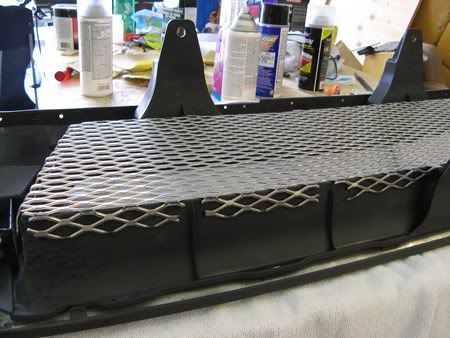
First, you need to get your grill cut to the right dimensions. I did this by setting the mesh on the surround and marking off where I needed to cut with a sharpie. I left about 1”-1.5” over the main grill area so that I could easily bend it over. REMEMBER you can always cut it shorter, but making it longer is a little tricky. I left about a half an inch or a little more on the small ‘fang’ areas and used an angle grinder with a cutting disk on it to cut it all.
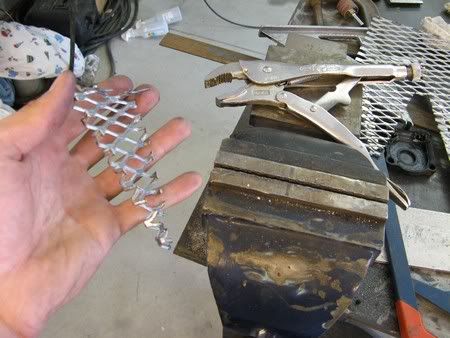
Now that you have the mesh cut, you need to get it ready for attaching it to the grill surround. After toying with some ideas on how to attach the mesh including brackets with screws or bolts, I decided upon simply bending the grill over the edge and slathering on some epoxy. Before you bend anything, lay the mesh on the surround and use a sharpie to mark where you want to bend it. I bent the smaller ‘fang’ area mesh pieces using a combination of vice grips and a vice with a sledge hammer. Place the mesh in the vice and use a wood block to help spread the load from the sledge hammer so distortion of the mesh is minimized. Make sure you only bend one side of the mesh at a time and keep test fitting it to make sure its going to work. I used the vice grips to make small tweaks at specific locations so it had a nice tight fit. Even without the epoxy applied, the connection already felt fairly strong which was quite comforting.
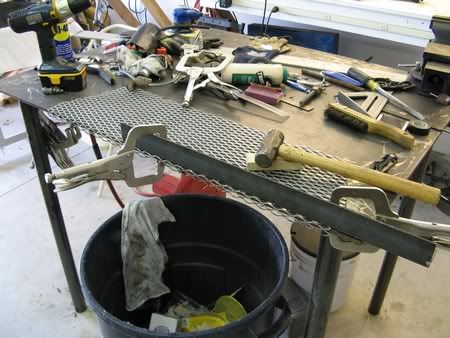
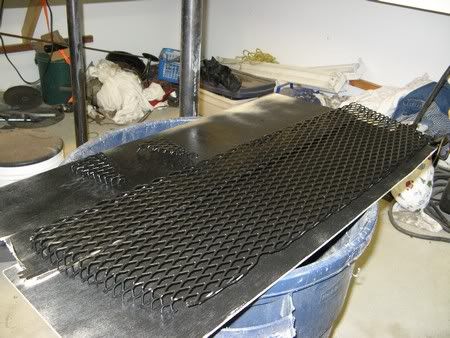
Bending the Main Mesh:
So, the main mesh area is a little larger and would be a bit tricky to do in the vice so I attached it to a table using some clamps and an angle for additional support. Before I clamped it down, I laid it on the grill surround and marked where I needed to bend plus the locations where I would run into any interference. I decided that I’d just use some tin snips to cut out these areas. Now, using the same method as the smaller areas, I bent the mesh using a sledge and a wood block. Again, make sure you bend one side at a time and keep test fitting and remarking as needed. I was able to bend the top and bottom by hitting the mesh downward and had to turn the mesh over and hit upward using a smaller piece of angle for the sides. Take your time and fine tune it with vice grips and tin snips.
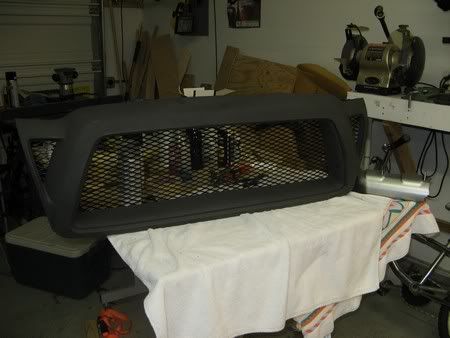
Now that we know the grill will fit, take it off and get it nice and painted. I applied 3 coats of the adhesion promoter and 4 coats of the Rustoleum Industry Choice - Gloss Black. Make sure you apply the color coat from each direction to get all the crevices. I chose the industry choice paint for its resistance to fading, abrasion and chipping.
I bought a 40”x12” sheet of flat expanded metal (plenty for what I needed) from a local welding shop for $20… You can either do that, find another mesh you like elsewhere or purchase a $200 grillcraft grill online… yeah, no thanks!
First, you need to get your grill cut to the right dimensions. I did this by setting the mesh on the surround and marking off where I needed to cut with a sharpie. I left about 1”-1.5” over the main grill area so that I could easily bend it over. REMEMBER you can always cut it shorter, but making it longer is a little tricky. I left about a half an inch or a little more on the small ‘fang’ areas and used an angle grinder with a cutting disk on it to cut it all.
Now that you have the mesh cut, you need to get it ready for attaching it to the grill surround. After toying with some ideas on how to attach the mesh including brackets with screws or bolts, I decided upon simply bending the grill over the edge and slathering on some epoxy. Before you bend anything, lay the mesh on the surround and use a sharpie to mark where you want to bend it. I bent the smaller ‘fang’ area mesh pieces using a combination of vice grips and a vice with a sledge hammer. Place the mesh in the vice and use a wood block to help spread the load from the sledge hammer so distortion of the mesh is minimized. Make sure you only bend one side of the mesh at a time and keep test fitting it to make sure its going to work. I used the vice grips to make small tweaks at specific locations so it had a nice tight fit. Even without the epoxy applied, the connection already felt fairly strong which was quite comforting.
Bending the Main Mesh:
So, the main mesh area is a little larger and would be a bit tricky to do in the vice so I attached it to a table using some clamps and an angle for additional support. Before I clamped it down, I laid it on the grill surround and marked where I needed to bend plus the locations where I would run into any interference. I decided that I’d just use some tin snips to cut out these areas. Now, using the same method as the smaller areas, I bent the mesh using a sledge and a wood block. Again, make sure you bend one side at a time and keep test fitting and remarking as needed. I was able to bend the top and bottom by hitting the mesh downward and had to turn the mesh over and hit upward using a smaller piece of angle for the sides. Take your time and fine tune it with vice grips and tin snips.
Now that we know the grill will fit, take it off and get it nice and painted. I applied 3 coats of the adhesion promoter and 4 coats of the Rustoleum Industry Choice - Gloss Black. Make sure you apply the color coat from each direction to get all the crevices. I chose the industry choice paint for its resistance to fading, abrasion and chipping.
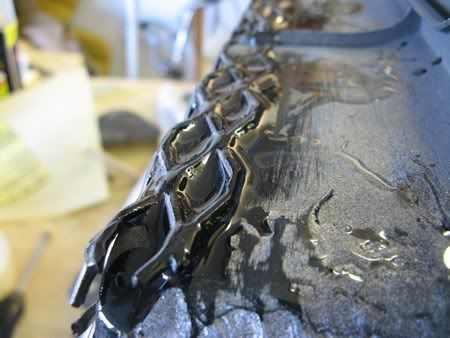
Step 7: EPOXY TIME - Attaching the Grill to the Surround
Before you go mixin up the epoxy and getting all giddy about applying it, we need to do a little prep work. Go and grab your 80 grit and start roughing up the surface around where the grill will attach. Make sure you get it nice and rough so the epoxy has something to grab a hold of. After you are satisfied with your sanded surface, clean up the grill and get rid of all that dust you just made… geez, stop makin a mess.
Now you can get excited! Start mixing the epoxy following the instructions on the box/bottle. Mine (Loctite) required that I mix the resin and the hardener at a 1:1 ratio. I mixed this up in a paper cup (using a new paper cup each mix) and used a flat head screw driver and a putty knife to apply the epoxy. Tip up the grill so the surface you are applying the epoxy to is flat or sloped away from the main opening. Be careful not to apply too much while putting on the epoxy. I accidentally did this a few times and it’d run out into the front of the grill… caused me a little more work and frustration in trying to clean it all up, but, luckily, I got it.
Take your time and do one side at a time but move fairly quick on each side as the epoxy kicks fairly fast. Mine was a 5 minute epoxy and it was liquid until maybe 5 minutes (seemed faster than that sometimes) and instantly went from runny to solid.
While you are waiting for all that epoxy you just applied to dry (8 hrs for good bond, but about 24 hrs for full cure), prep your truck for its new grill.
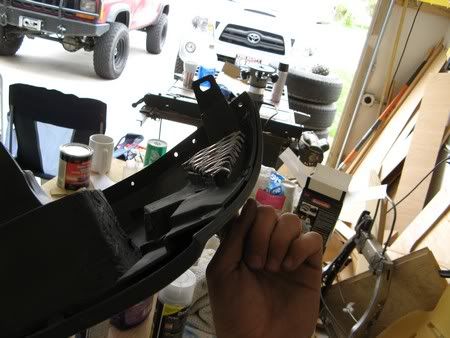
Step 8: Preparing your truck for its new grill (suggested)
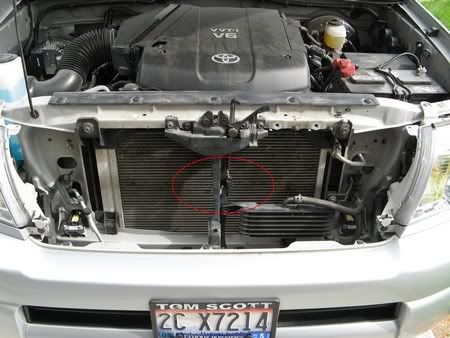
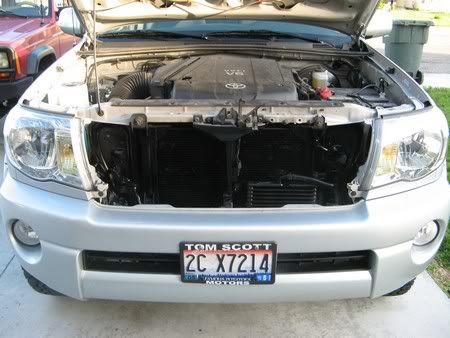
Now, when you put this new grill on, you’ll notice that you can see through the mesh to whats behind it… All that silver shows up and you can see the horns. I suggest relocating the horns to the location shown in the photo below, but when doing so make sure you leave (if applicable) the temperature sensor (circled red in the second photo) in its location as you wouldn’t want the temperature of your engine compartment on your outside temp gauge. I kept the additional wire shield on the temp sensor wire and simply ran the gray ‘horn wire’ along the hood latch wire and back to the location where the horns sit now. Note that you will have to adjust the connection brackets on the horns so they can comfortably sit in their new location. I tested the sound of the horn and its no different from outside the car… It may be a little bit louder inside, but I don’t think much… I guess there’s also another location behind the lower front bumper, but I liked this spot better since they won’t get damaged or fill with water.
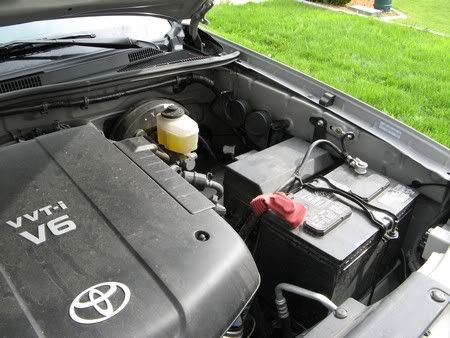
AND as for all that silver, PAINT IT. You can paint it with high temp paint as I’ve seen some do, but I just decided to paint it with some of the gloss black paint that I already had and figured, if it came off, I could always paint it again.
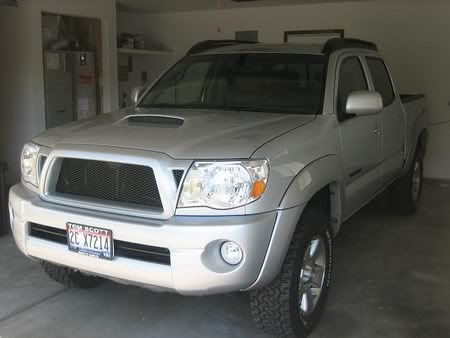
FINAL STEP!!!!: Put that grill on and show off your ride!
Ok… Pull out the weird looking contraption and attach it to your grill, then replace the grill, insert the expansion anchors and replace those screws… now step back and VOILA!
Before you go mixin up the epoxy and getting all giddy about applying it, we need to do a little prep work. Go and grab your 80 grit and start roughing up the surface around where the grill will attach. Make sure you get it nice and rough so the epoxy has something to grab a hold of. After you are satisfied with your sanded surface, clean up the grill and get rid of all that dust you just made… geez, stop makin a mess.
Now you can get excited! Start mixing the epoxy following the instructions on the box/bottle. Mine (Loctite) required that I mix the resin and the hardener at a 1:1 ratio. I mixed this up in a paper cup (using a new paper cup each mix) and used a flat head screw driver and a putty knife to apply the epoxy. Tip up the grill so the surface you are applying the epoxy to is flat or sloped away from the main opening. Be careful not to apply too much while putting on the epoxy. I accidentally did this a few times and it’d run out into the front of the grill… caused me a little more work and frustration in trying to clean it all up, but, luckily, I got it.
Take your time and do one side at a time but move fairly quick on each side as the epoxy kicks fairly fast. Mine was a 5 minute epoxy and it was liquid until maybe 5 minutes (seemed faster than that sometimes) and instantly went from runny to solid.
While you are waiting for all that epoxy you just applied to dry (8 hrs for good bond, but about 24 hrs for full cure), prep your truck for its new grill.
Step 8: Preparing your truck for its new grill (suggested)
Now, when you put this new grill on, you’ll notice that you can see through the mesh to whats behind it… All that silver shows up and you can see the horns. I suggest relocating the horns to the location shown in the photo below, but when doing so make sure you leave (if applicable) the temperature sensor (circled red in the second photo) in its location as you wouldn’t want the temperature of your engine compartment on your outside temp gauge. I kept the additional wire shield on the temp sensor wire and simply ran the gray ‘horn wire’ along the hood latch wire and back to the location where the horns sit now. Note that you will have to adjust the connection brackets on the horns so they can comfortably sit in their new location. I tested the sound of the horn and its no different from outside the car… It may be a little bit louder inside, but I don’t think much… I guess there’s also another location behind the lower front bumper, but I liked this spot better since they won’t get damaged or fill with water.
AND as for all that silver, PAINT IT. You can paint it with high temp paint as I’ve seen some do, but I just decided to paint it with some of the gloss black paint that I already had and figured, if it came off, I could always paint it again.
FINAL STEP!!!!: Put that grill on and show off your ride!
Ok… Pull out the weird looking contraption and attach it to your grill, then replace the grill, insert the expansion anchors and replace those screws… now step back and VOILA!
Optional Step After the Final Step:
Get some emblage! Typically people will put an old TOYOTA emblem from the old LandCruisers, but I went with a Chrome TRD emblem in the lower right just to break things up a little...


No comments:
Post a Comment